Step #3: The GCC Compiler and Tools
Update: This page only applies to Teensy 2.0. Teensy 3.0 is supported by Teensyduino. To use Teensy 3.0 without Arduino, first install Teensyduino. A sample makefile is installed in hardware/teensy/cores/teensy3. The makefile comments explain how to detete the unnecessary portions of Arduino, if you wish to use only the makefile.To compile C and C++ programs, you will need a collection of programs including avr-gcc, the avr-libc C library and avr-binutils. Installing all the required pieces separately can be difficult. Fortunately, there are complete, easy to install packages for all major platforms.
Macintosh OS X
Download AVR MacPack. The MacPack disk image has an installer that does everything for you. The following command may need to be entered (in Terminal) to choose the version of gcc which works with Teensy.
avr-gcc-select 4
Linux, Ubuntu 8.10
Ubuntu provides packages, so you can just install them using this command.
sudo apt-get install gcc-avr binutils-avr avr-libc
Windows XP & Vista & 7 & 8
Download WinAVR, which includes everything you need, with a nice installer.Using Make to Compile Blinky
Download: Blinky Example Source Code (zip file)Now that you have the compiler installed, a first step is to compile the blinky source into a .HEX file you can put onto your Teensy using the Teensy Loader. Of course, if you skipped the previous step, you'll need to install the Teensy Loader to make use of the .HEX file created here.
Make is a command line program that automatically runs the compiler and other related programs to perform all the steps necessary to compile your code into the .HEX file. Fortunately, make is very simple to use. At the command prompt, just type "make".
On Windows XP or Vista, you need to run "Command Prompt" which is in the Start menu under All Programs -> Accessories. On Mac OS X, run Terminal, which is found in Applications/Utilities. Linux systems have many ways to access the command line. On all systems, the command line works in basically the same way.
The command line interface accesses a single directory, which is usually shown in the prompt. You can type the "cd" command to change this directory. If you find typing commands cumbersome, just take notice of which directory is used and place the blinky files in that location. For example, in the screenshot below the directory is "C:\Documents and Settings\me" and the files from blinky.zip were just copied to that location.
Just type make and it will do everything and give you detailed information.
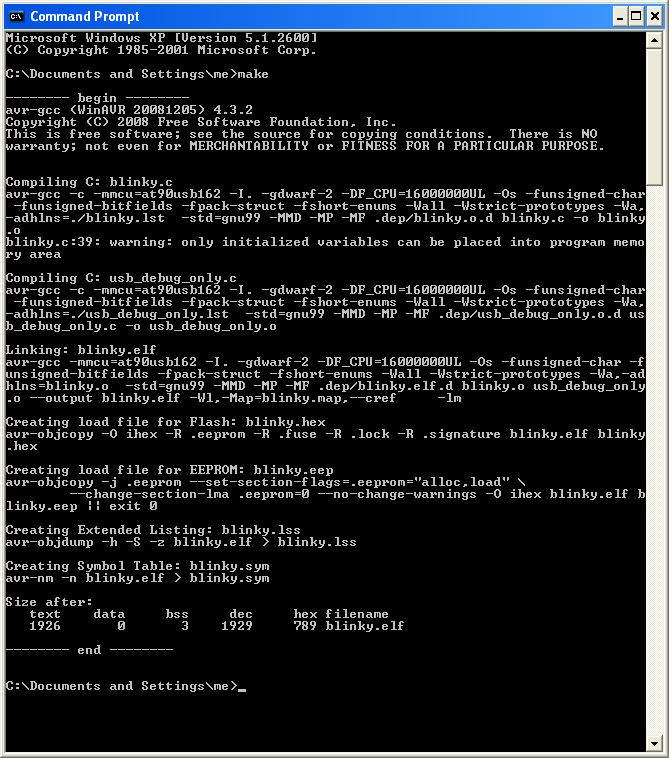 |
That is a lot of information! Really, the most important is what is NOT shown, any errors that prevent make from completing the job. Normally when you run make, if you see the size summary at the end, you've got a .HEX file and you just reach over and press the pushbutton and (if Teensy Loader is in Auto mode) within a few seconds your freshly compiled code starts running!
Blinky blinks messages in Morse Code on the LED, so you should see patterns of Morse Code messages when the Blinky starts running.
The size summary is usually worth reading. In this example, "text" is 1926 bytes, "data" is 0, and "bss" is 3 bytes. The "dec" and "hex" are just the sum of these other numbers. So what to these names really mean?
| Section | Meaning |
|---|---|
| text | Compiled C code, in Flash memory |
| data | Variables that get initialized at startup, Flash and RAM |
| bss | Variables that are zero at startup, RAM only |
Just add the text and data numbers to get the total flash memory used. The Teensy Loader also shows the percentage of the chip your HEX file consumes.
RAM usage is more difficult to understand. The data and bss variables are placed at the beginning of the RAM. Local variables, function call return addresses and temporary memory used by interrupt routines are allocated on a stack that starts at the highest RAM address and grows downward, towards your variables. There is no easy way to know exactly how much memory the stack will use. TODO: write a separate page about this topic with ways to estimate stack usage... link to it from here
Understanding the Makefile
When you run make, it reads a file named "Makefile" for instructions to build your code. The Makefile can be edited with any text editor. It is long and complicated, but fortunately only a few very simple settings need to be edited for most projects.Near the beginning of the file, you will find these definitions. TARGET is the name of your project. You may want a better name than "blinky".
# Target file name (without extension).
TARGET = blinky
SRC is the list of all your source files. There are generally 3 reasons to structure your program into different files.
- Related functions can be grouped into separate files, usually so you do not need to bother seeing them as you edit other code.
- Make detects which files have changed and only recompiles those, reducing total compile time for incremental changes.
- Code you download from this site and others comes as separate C files. Adding them to your Makefile is the easiest way to use them. Especially if the C code is updated, keeping it separate from others makes replacing the old version much easier than if you copy-and-paste code into one giant file.
# List C source files here. (C dependencies are automatically generated.)
SRC =   $(TARGET).c \
        usb_debug_only.c
As you add more files to your project, just include each one in this list. The backward slash "\" at the end of a line means the SRC list continues on the next line, so be sure every line except the last ends in a backward slash.
Usually each .c file will have a .h header that you use with #include in the other .c files that will call its functions or access its variables. The "C dependencies are automatically generated" means you to NOT need to specify the .h files and which .c files include them. Make will examine your code and learn all those dependencies automatically.
Details In The Blinky Source Code
Near the top of blinky.c are these definitions, for using the LED.
#define LED_CONFIG      (DDRD |= (1<<6))
#define LED_ON          (PORTD &= ~(1<<6))
#define LED_OFF         (PORTD |= (1<<6))
PORTD and DDRD are the actual hardware registers that control the port D pins, and these definitions provide easy-to-read names for the LED. See the using I/O pins page for details.
Several definitions follow, including some unusual string syntax.
void morse_string_P(const char *s);
#define morse(s)        morse_string_P(PSTR(s))
Normally, all variables (even string constants) are placed in RAM. But there isn't much RAM available and string constants are rather wasteful, because a copy would be in flash anyway to initialize the RAM at startup! The PSTR macro causes the string to be placed in flash memory. By convention, functions ending in "_P" do special operations to read from flash instead of RAM. (TODO: link to page with details about program space)
Blinky's main loop is very simple. It will just blink "SOS" 6 times, then blink a long question, and repeat forever. The _delay_ms() function is provided by the C library.
        while (1) {
                for (i=0; i<6; i++) {
                        morse("SOS");
                        _delay_ms(1500);
                }
                morse("DOES ANYBODY STILL KNOW MORSE CODE?");
                _delay_ms(4000);
        }
Inside the morse_character() function, which blinks a single character in Morse Code, there are calls to usb_debug_putchar() and print(), which just calls usb_debug_putchar().
        if (c < 'A' || c > 'Z') {
                print("Opps, unsupported character: ");
                usb_debug_putchar(c);
                print("\n");
                return;
        }
The HID Listen program is used to receive and display all these characters. If your Teensy is blinking Morse Code, now is the time to install HID Listen to see these messages.