Using Flight Sim Controls
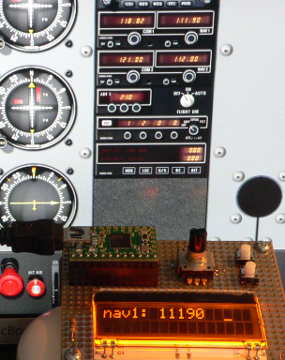 NavFrequency Example |
A simulator plugin is used. Currently X-Plane is supported.
| Download: | TeensyControls X-Plane Plugin 1.0 (32 bit only) |
| TeensyControls X-Plane Plugin 1.0 (32 & 64 bit, X-Plane 10.20 or greater) | |
| Latest TeensyControls Source Code |
Together with Arduino functions and libraries, Flight Sim Controls provides an incredibly flexible platform for implementing almost any type of flight simulation control.
Update: Jorg Neves Bliesener has created an updated plugin which works with DataRef names longer than 58 characters. Look in the "target/TeensyControls" folder for a compiled copy.
Quick Installation Steps
|
Example Programs
Examples are available in File > Examples > Teensy > USB_FlightSim.
Special Variable Types
Special variables provide access to simulator data and commands. You create these as global variables in your code. They work like normal variables, but their data is linked to the flight simulator.In setup(), your code links the variables to data or command names in the simulator. Unlike game controllers, the data mapping is reliable. You can even reprogram or unplug and reconnect your Teensy while the flight simulator is running, and it will always access the data and commands you specify.
Commands: FlightSimCommand (Write Only)
Variable type "FlightSimCommand" creates a variable which sends commands.
// Create Variables (global scope)
FlightSimCommand NavCoarseUp;
FlightSimCommand NavCoarseDown;

// Configure the X-Plane variables in setup
void setup() {
  NavCoarseUp = XPlaneRef("sim/radios/actv_nav1_coarse_up");
  NavCoarseDown = XPlaneRef("sim/radios/actv_nav1_coarse_down");
}
Writing a 1 to a command variable activates the command. For most commands, this is equivelant to pressing a button. Writing a 0 deactivates the command, or releases the button.
A special once() function can also be used. See the NavFrequency example.
Data: FlightSimInteger & FlightSimFloat (Read or Write)
Simulator data can be accessed as integers or floating point (decimal) numbers.// Create Variables (global scope) FlightSimInteger NavFrequencyHz; // Configure the X-Plane variables in setup void setup() { NavFrequencyHz = XPlaneRef("sim/cockpit2/radios/actuators/nav1_frequency_hz"); }
Writing Data
To change data in the simulator, simply write to the variable using the equals sign "=".
NavFrequencyHz = 10050; // Set the radio to 100.50
Please keep in mind each write causes a small amount of USB communication. Care should be
used to write only when necessary.
Avoid continuously writing. For pushbuttons, the Bounce library risingEdge() or
fallingEdge() functions provide a perfect way to detect changes.
Reading Data
Your program must call FlightSim.update() to receive data from the simulator. Any FlightSimInteger or FlightSimFloat variable changed by the simulator will have their new values after FlightSim.update().Reading the variables in equations or function inputs does not cause additional USB communication. FlightSim.update() stores a copy of the simulator's data on Teensy, so you can read the variables without any delays.
Automatic onChange() Updates
Data variables can be configured to automatically call a function when their value changes. Often this is much easier than checking for changes in loop().void setup() { NavFrequencyHz = XPlaneRef("sim/cockpit2/radios/actuators/nav1_frequency_hz"); NavFrequencyHz.onChange(update_lcd); // update the LCD when X-Plane changes } void loop() { FlightSim.update(); // <-- causes actual reception of data } void update_lcd(long val) { // Runs automatically, only when X-Plane changes the data lcd.setCursor(6, 0); lcd.print(val); lcd.print(" "); }
Array Access
Some simulator data is arrays of numbers. You can create variables which access 1 element within the array by adding "[num]" to the end of the XPlaneRef() string. The "num" index is zero based. If you need to access the entire array, create as many variables as necessary, each with its own index.FlightSimFloat throttle; // access to X-Plane's throttle void setup() { throttle = XPlaneRef("sim/flightmodel/engine/ENGN_thro[0]"); // [0] is first element in array throttle.onChange(viewThrottle); }
Status: FlightSim.isEnabled() (True / False)
The FlightSim.isEnabled() function indicates if X-Plane is running and the TeensyControls plugin is enabled. This can be useful automatically shut off displays or higher power devices when X-Plane is not running.
  // the LED shows if X-Plane is running and plugin is enabled
  if (FlightSim.isEnabled()) {
    digitalWrite(LED_BUILTIN, HIGH);
  } else {
    digitalWrite(LED_BUILTIN, LOW);
  }
Timing: FlightSimElapsedFrames (Read or Write)
This special variable type creates an integer which automatically increments every simulation frame.
// variables
FlightSimElapsedFrames frameCount; // increases each simulation frame
elapsedMillis milliSeconds;        // increases 1000 per second
Debugging
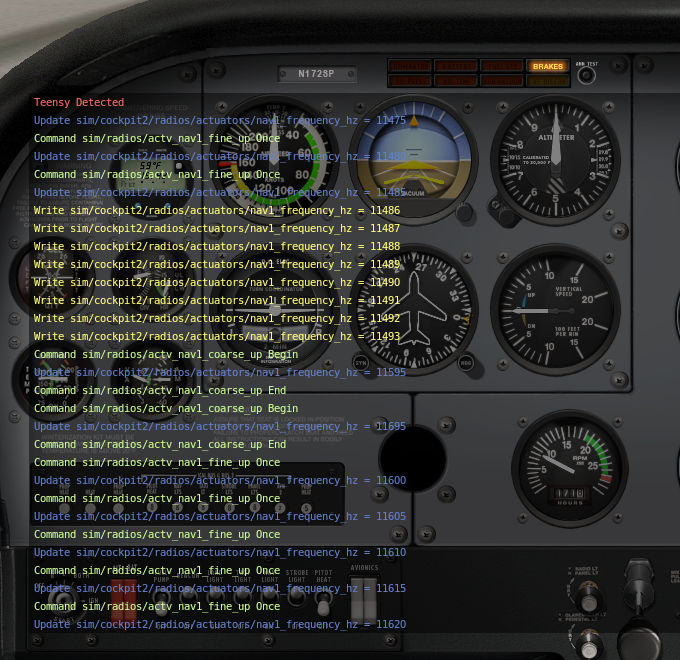
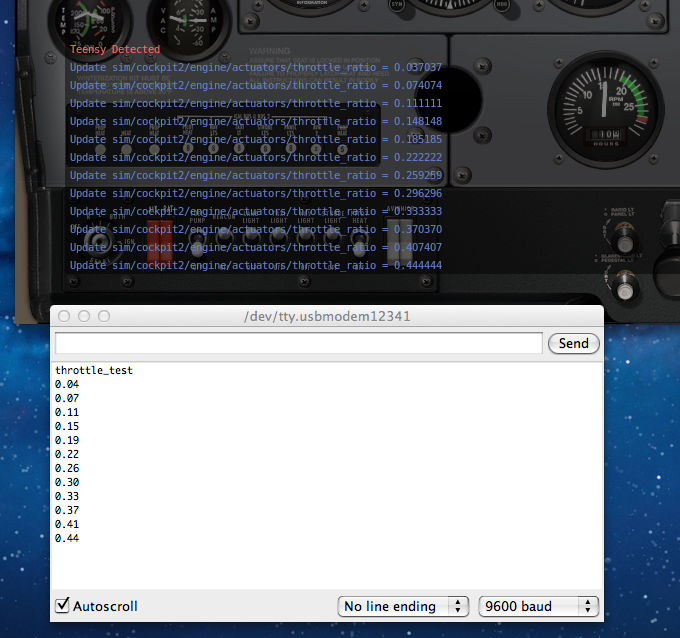
When Teensy doesn't communicate the way you want, tools are available in X-Plane and Arduino to help you see what's actually happening.TeensyControls Show Communication
A "Show Communication" option is available in the Plugins > TeensyControls menu within X-Plane. Sometimes unplugging and reconnecting Teensy after Show Communication is active can really help.
Arduino Serial Monitor
The Arduino Serial Monitor can help you observe your program on Teensy. You must place Serial.print() lines in your code. The text appears in the Arduino Serial Monitor. If your program "gets stuck" or "never sends data", a few well placed Serial.print() lines can usually help you solve the problem!
Finding X-Plane Data
X-Plane and the plugin SDK provide many commands and data references. Files Commands.txt and DataRefs.txt in X-Plane's Resources/plugins folder have complete lists. This list data references can be a convenient reference for DataRefs.The DataRefEditor plugin lets you easily view and modify data. You can test your idea or verify the data works as expected before writing code on Teensy.
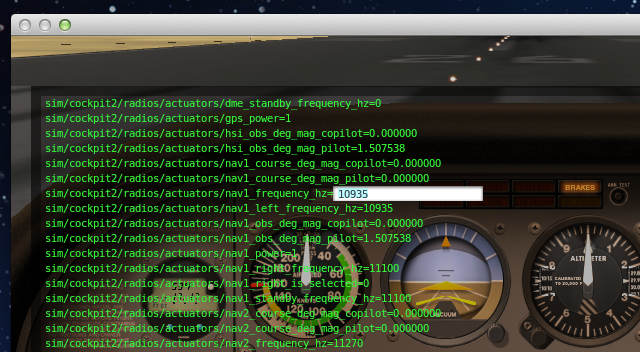 DataRefEditor Plugin |
Some helpful tips from Dozer:
The plugins forum is probably the best place to ask about how particular datarefs/commands work, I think. That, and/or the aircraft and panel development forum. Until you wrote this code for the Teensy, users would only be choosing commands and datarefs when they're designing 2d panels and 3d cockpits or building plugins. The beauty of your Teensy/X-Plane integration is that the Teensy has become functionally very similar to a plugin or a 3D cockpit or a 2D panel in terms of how it interacts with X-Plane.This is the general hierarchy for choosing what to use:
For example, one of my most recent plugins simply turns off some of the radios when the aircraft is loaded with the engines off. There's no 'turn off NAV1 radio' command, just a 'toggle NAV1 power switch' command, which isn't suitable by itself - the radio might already be off, so blindly issuing that command might just toggle it on. We could read the sim/cockpit2/radios/actuators/nav1_power dataref and then decide whether to issue the sim/radios/nav1_power_toggle (I'm guessing the name) command but it's much simpler just to blindly write '0' to the dataref.
- Is there a command which does what you want to do? Then use that.
- Else, is there a sim/flightmodel2/ or sim/cockpit2/ dataref which produces the right result? Then use that. (If you're not concerned about functionality on older X-Plane versions.)
- Otherwise, use one of the other datarefs.
With my SEP2 autopilot Teensy, which must turn functions both on and off, and which must allow other interfaces to access those functions, I have to compare the function's dataref to the hardware switch position and then issue the 'toggle function' command. But there are many X-Plane functions which don't have commands, and a few which are tricky to access by dataref too - autopilot speed hold mode for example. (For activate that function, I have to read the autopilot_state dataref, bitmask it to remove the other pitch modes, set the appropriate flag, then write the resulting value back to the dataref.)
 |
Large System Guidelines
The TeensyControls plugin can use any number of Teensy boards. Multiple Teensy or Teensy++ boards can be used with USB hubs to partition large I/O requirements.These design guidelines are recommended:
- Memory: 50 data variables per Teensy, 100 per Teensy++.
- Communication: 20 data changes or 40 commands per simulation frame.
- Interrupt pins: 4 rotary encoder per Teensy, 8 per Teensy++.
Teensy can often work beyond these limits, but for best performance multiple boards should be used to keep each one within these recommended maximums.
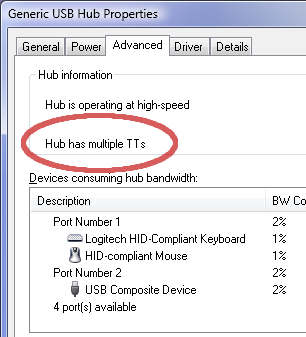
USB Hubs & Controllers
USB hubs should be "Multi-TT" (Transaction Translator) types. The Multi-TT design allows many 12 Mbit/sec Teensy boards to share a single 480 Mbit/sec USB port. Single-TT hubs do NOT properly share USB bandwidth!
If more than 60 Teensy boards are connected, or high bandwith USB
devices are present (eg, webcams, USB speakers, etc) a USB 3.0 port
and hub should be used. USB is limited to 127 devices per controller,
but multiple USB controllers can be installed. If you build such
an incredible system, please send us a photo!
Additional Information
This lengthy forum thread contains much of the history of developing this flight sim control feature.Special thanks to Dozer, whose email conversation led to the inspiration to develop Teensyduino's flight sim control USB type.