Kids Keyboard for Controlling Media Center

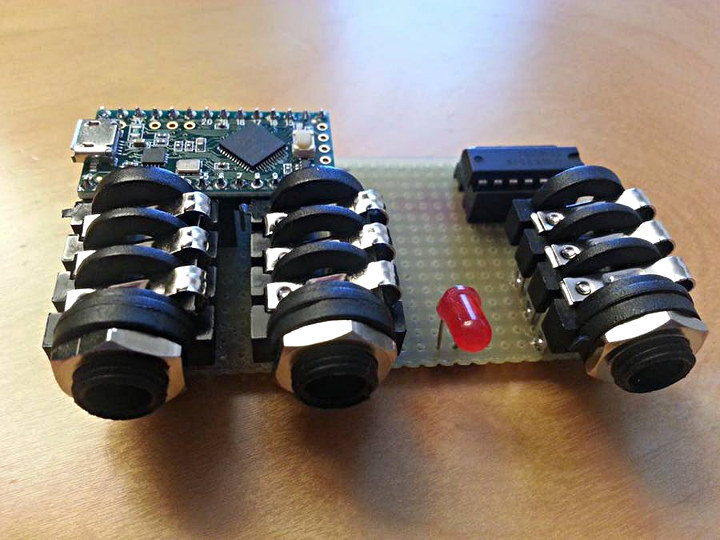
Scott Penrose decided to make keyboard for his kids that would be rugged enough for them after having a few different wireless keyboards dropped and broken.

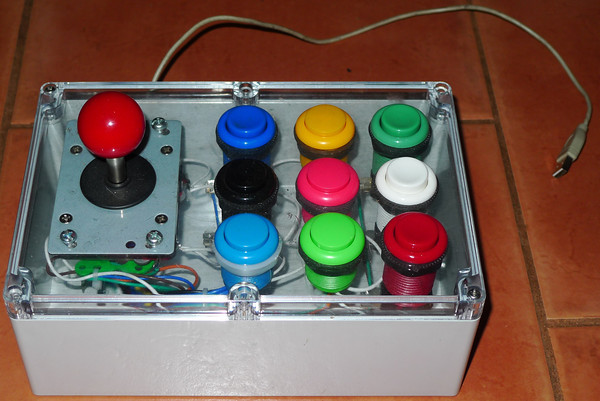
The current version is hardwired using an Teensy 2.0.  My original version used a 3.3V mega and Bluetooth module, and a nunchuck – it used gestures to control the TV. The plan was to build a bluetooth box for the kids with solar panel for charging. This updated version went with Teensy for simplicity (no battery, no charger, and mostly no Bluetooth reconnect issues).

Scot says what amazed him was how easy the whole project is.  He spent about an hour building the box and another hour writing the software, which can be found on GitHub.

Musical Skins

Maurent Donneaud made a fabric interface for music control.  The Musical Skins are a fabric interface that can be used to play music.  When the skins are draped over the body, interesting feedback modalities emerge.

This video demonstrates a skin in action.

The skins are made from conductive fabric.  Detailed construction information can be found here.  The code for the project can be found on GitHub.

The skins can be programmed to play different roles – a drum kit, a lead instrument, or harmonics.  Different instruments are available on GitHub.

C1 Chameleon Synth

Johan Bilén (forum user johanbilen) posted about his C1 Chameleon Project – a monophonic subtractive synthesizer.


It’s based around a Teensy 3.2 and an Audio Adaptor. The synth is controlled by two illuminated rotary encoders and data is displayed on a 0.96″ OLED.

This nifty little synthesizer has three oscillators with six waveforms, white noise generator, glide, resonant low-, band- and highpass filter, a mixer section, four LFO’s and four envelope generators and 100 preprogrammed presets. Each section (pitch, pulsewidth, filter frequency and amplifier) can be modulated by an envelope or an LFO.

Wii Classic Controller to USB Joystick

Haven King is a fan of the Wii classic controller, but didn’t really like having to keep the wireless controller charged up for occasional bouts of nostalgia, so he hacked his controller to be used and powered over USB.


Haven opened up hi controller, removed the accessory port mechanism, and found there was just enough space to fit a Teensy-LC.  He then hacked up an old USB phone cable that matched the controller and wired it up to the Teensy.  Then he connected the controller to the Teensy along with a couple of 4.7k pull-up resistors for the I2C pins.  The code for the project can be found on GitHub.

MIDI Adapter for Neo Ventilator

Marco de Vivo built a MIDI adapter for the Neo Ventilator.  He says the Neo Ventilator is a great leslie simulator, but it lacks MIDI, so he built his own MIDI adapter for it.

The UPS powered adapter includes a stereo output jack for Neo Ventilator connection and foot pedals to control slow/fast velocity and stop rotor.

This video shows the Ventilator and the adapter in action.


LED Table with Bubble wall

Forum user sevEnil2 (Severin N), together with his brother, built an LED table with bubble wall.  Not only does this table feature LEDs wtih and infinity mirror, it also has aquarium tanks on all 4 sides.  The use of the CD drive to house the controls is one of the many cool features of this project.

The pair undertook the project to learn about micro controller programming, woodworking, and custom tank making.  They found a lot of help with their projects from on-line communities.  You can follow the discussions about the development on this forum thread and this one  well.  There is also this Google + conversation to check out.


RFID Door Lock with Battery Backup

Elmue made his own RFID door lock with battery back up.  He was inspired after reading some articles about home burglars.

After searching for an electronic door lock, and not being satisfied by what he found, Elmue decided to build his own.  The design features a powerful battery back up, an easy to use interface, the ability to store up to 64 users, and it mounts inside the door so it’s not visible from outside or exposed to the elements.

There is an excellent, detailed write up on the project that include a schematic, parts list, and code.