Ambilight with FastLED

David Henderson and his brothers installed their own ambilight on the back of their new TV and the end result looks awesome.

Ambilight is a technology by Philips that uses LEDs mounted on the back of their TVs to add ambient light.  David retrofitted his TV using a total of 100 addressable LEDs.  The project uses a Teensy 3.2 and takes advantage of the FastLED library.

Check out the Instructables page for details on how you can build your own.

Code for the project is also available on GitHub.

Polaron DIY Drum Machine

“A guy called Tom” made the Polaron, a 16 step, 6 track digital DIY drum machine.

Driven by his curiosity to understand and experiment with interaction patterns on digital musical intruments, Tom made the Polaron.  It combines features from other drum machines that he knows and loves as well as new features he found useful during development.  The current list of features includes:

  • 16 step sequencer
  • 6 instrument tracks
  • 2 pots for parameter control
  • parameter locks: all instrument parameters can be recorded for each step
  • different pattern length for each instrument track
  • midi sync
  • crunchy 12bit stereo outputs

This video show the Poaron in action with a Waldorf Blofeld keyboard synthesizer

The project is fully open source with the code available on GitHub

There is also Wiki page available with instructions on how to build your own

Impedance Spectroscopy

Circuit Cellar Magazine Issue #344 features this article by Brian Miller, using AD5933 and Teensy LC.

Measurement of impedance over a range of frequencies can be useful for testing speakers & microphones, monitoring corrosion in metals, and biomedical applications.  Pick up a copy of Issue #344 for the full build details, including schematics & access to the software.

Console Emulators Collection

Jean-Marc Harvengt has done some pretty amazing work with a collection of console emulations, including the Atari 2600/5200, NES, Colecovision, and Philips Odyssy.

Jean-Marc was inspired by  Frank Bösing’s work on emulating the Commodore 64.  Currently the collection supports the Atari2600, Philips Videopac/Odyssey, colecovision, NES and Atari 5200 consoles; and the Zx80/Zx81, Zx Spectrum, and Atari800 computer cores.

All the emulators support both ILI9341 TFT and VGA output.

There’s some pretty amazing work going on here that brings up some serious nostalgia.

Code for the collection is available on GitHub.


Vortex Manipulator

Roger Parkinson made a very cool Vortex Manipulator, complete with a Dalek detector

Inspired by the vortex manipulator worn by Captain Jack Harkness of Dr Who and Torchwood, this steampunk-esque wrist mounted device includes a lot of useful features.  In addition to having clock, it also has a compass, picture gallery, heart rate monitor, and Dalek detector.

The device is powered by a Teensy 3.2 and uses an ILI9341 touchscreen for the interface.  The Teensy worked out well as a development platform for the project.  It had plenty of capacity to add more features as the project progressed, such as a heart rate monitor with an I2C interface.

Detailed information about the build can be found on this page.

Code and Eagle files for the project can be found on GitHub.


Music Reacting Infinity Mirror

Forum user Haybur upgraded his LED display from college into in a sound reactive infinity mirror.

The first part of the upgrade was using WS2812 LEDs and mounting them on a wall, then someone suggested turning it into an infinity mirror.

The memory and processing power of the Teensy 3.6 with Audio Shield and using the audio library along with the OCTOWS211 library made the project happen.

Big 7-Segment Countdown Timer

Years ago, several “short” talks at a hackerspace that went far beyond their allotted time inspired me to make this nice countdown timer.

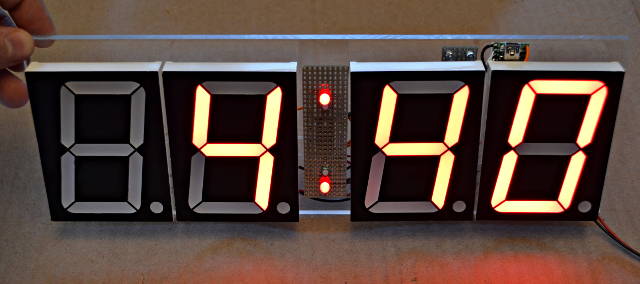
I found these 4 inch 7 segment displays cheap on Ebay, made a little constant-current driver board, and put it all together into a simple project.

Here’s what the back side looks like, with buttons to control the countdown.

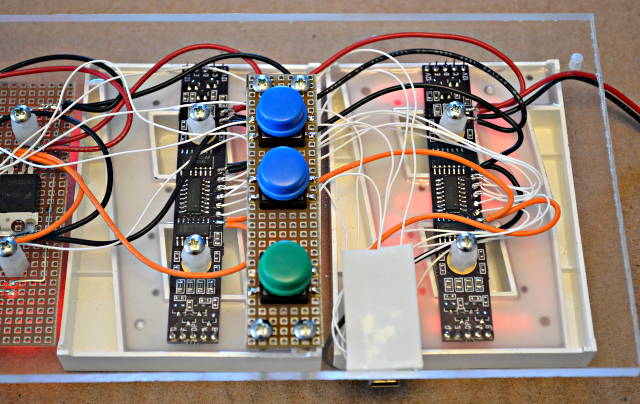
The green buttons starts & stops the countdown.  The 2 blue buttons add or subtract 1 minute.  It’s a very simple and minimal user interface!


Here’s a rough schematic for the whole project.  Well, except I left off the 7805 regulator and maybe some other mundane stuff, but this is pretty close.

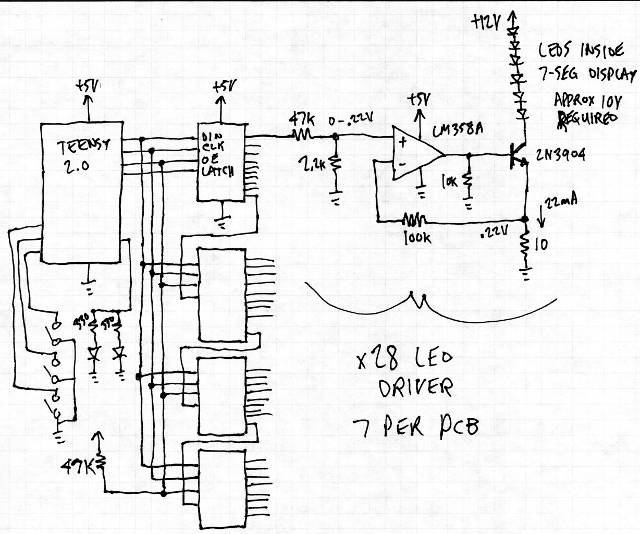
The main challenge was driving the LEDs with a constant current, because they need about 10.5 volts across the several series LEDs.  I wanted to run from 12 volts, so there wasn’t much voltage left over for the normal current limiting resistors.  Instead, I used this opamp circuit.

(edit: opps, I wrote LM358A on the schematic, but it’s actually a LM324A opamp.  Really, they’re the same, just 2 vs 4 per package… so you could use either if you try to build this on your own board, but if you use the PCB files below, get a 14 pin LM324A opamps)

The project runs from a Teensy 2.0.  The code is very simple, using the SPI and Bounce libraries for the hardware interfacing.

#include <SPI.h>
#include <Bounce.h>

// pins
//  0 - Latch
//  1 - Clock
//  2 - Data
//  4 - Enable (low=on)
//  9 - Dots (high=on)

Bounce button1 = Bounce(10, 12);
Bounce button2 = Bounce(23, 12);
Bounce button3 = Bounce(22, 12);

uint8_t min=5;
uint8_t sec=0;
uint8_t unused_pins[] = {3,5,6,7,8,11,12,13,14,15,16,17,18,19,20,21,24};

void setup()
{
	for (uint8_t i=0; i < sizeof(unused_pins); i++) {
		pinMode(i, OUTPUT);
		digitalWrite(i, LOW);
	}
	pinMode(10, INPUT_PULLUP);
	PORTC |= 0x80;
	pinMode(22, INPUT_PULLUP);
	pinMode(23, INPUT_PULLUP);
	digitalWrite(4, HIGH);
	pinMode(0, OUTPUT);
	pinMode(1, OUTPUT);
	pinMode(2, OUTPUT);
	pinMode(4, OUTPUT);
	pinMode(9, OUTPUT);
	digitalWrite(0, LOW);
	digitalWrite(1, LOW);
	digitalWrite(2, LOW);
	digitalWrite(4, HIGH);
	digitalWrite(9, LOW);
	SPI.begin();
	update();
}

uint8_t sevenseg[10] = {
	// gfedcba
	0b00111111, //  aaa
	0b00000110, // f   b
	0b01011011, // f   b
	0b01001111, //  ggg
	0b01100110, // e   c
	0b01101101, // e   c
	0b01111101, //  ddd
	0b00000111,  
	0b01111111,  
	0b01101111  
};

void update(void)
{
	if (min > 99) min == 99;
	if (sec > 59) sec = 59;
	SPI.transfer(min >= 10 ? sevenseg[min/10] : 0);
	SPI.transfer(min > 0 ? sevenseg[min%10] : 0);
	SPI.transfer(sevenseg[sec/10]);
	SPI.transfer(sevenseg[sec%10]);
	delayMicroseconds(2);
	digitalWrite(0, LOW);
	delayMicroseconds(2);
	digitalWrite(0, HIGH);
	digitalWrite(9, HIGH);
	digitalWrite(4, LOW);
	delayMicroseconds(5);
	digitalWrite(0, LOW);
}

elapsedMillis count = 0;
uint8_t running = 0;

void loop()
{
	button1.update();
	button2.update();
	button3.update();
	if (button1.fallingEdge()) {
		Serial.println("button1 - Start/Stop");
		if (running) {
			running = 0;
		} else {
			running = 1;
			count = 750;
		}
	}
	if (button2.fallingEdge()) {
		Serial.println("button2 - Add 1 minute");
		if (min < 99) {
			min++;
			update();
		}
	}
	if (button3.fallingEdge()) {
		Serial.println("button3 - Subtract 1 minute");
		if (min > 0) {
			min--;
		} else {
			sec = 0;
			running = 0;
		}
		update();
	}

	if (running && count >= 1000) {
		count -= 1000;
		if (sec > 0) {
			sec--;
		} else {
			if (min > 0) {
				min--;
				sec = 59;
			} else {
				running = 0;
			}
		}
		update();
	}
}

The 7 segment displays were something I’d purchased from an E-bay merchant about a year ago.  I can’t find then anymore (at least not for low prices), which is sad because they were really cheap at the time.

I actually created this PCB only days after the last Dorkbot open mic meetup (where talks went way beyond allotted time).  Here’s a photo of the board.

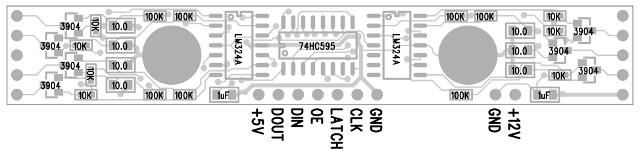
There’s actually quite a few parts on the board.  Here are the placement diagrams:

The circuit board can be ordered from OSH Park, or you can download the original gerber files if you’d like to have them made elsewhere.

If you find any of these awesome 4 inch displays, hopefully this little board will come in handy for driving them efficiently with only 12 volts.


This article was originally published on the DorkbotPDX website, on March 22, 2013.  In late 2018, DorkbotPDX removed its blog section.  An archive of the original article is still available on the Internet Archive.  I am republishing this article here, in the hope it may continue to be found and used by anyone interested in these 7 segment displays.

Interactive Bumblebee Costume

Ian Cole and a team of makers at MakerFX transformed a wheelchair into an amazing interactive Bumblebee costume.


Magic Wheelchair, a nonprofit organization that builds epic costumes for kids in wheelchairs, matched ATMakers to a kiddo for a wheelchair build.  ATMakers joined forces with MakerFX to build a wheelchair costume in 3 short weeks – in time for the Assistive Tech Industry Association conference.

Alex, the young man receiving the wheelchair uses assistive technology devices to communicate, so as part of the build the team decided their Bumblebee needed to be interactive using a keyboard.  The interactions they selected could be usable by Alex and worked into his physical therapy in the future.

The dashboard has a capacitive touch horn, two assistive technology buttons, a 320×240 LCD video screen, and 3 addressable LED rings.  The dashboard sends commands to the costume using USB MIDI notes.  This allows the costume to be controlled by either the dashboard or a keyboard.  All the controls and LEDs are powered by a Teensy 3.6 with a Teensy Audio Shield.  They used the FASTLED Library and the Non-blocking WS2812 LED Library to control the LEDs.  The USB Host capabilities of the Teensy 3.6 were used for the MIDI connection.

Code for the project is available in this MakerFX GitHub repository.

SBUS Tutorial by Bolder Flight

Brian Taylor of Bolder Flight has continued his great series of tutorials with the latest covering SBUS, a relatively new protocol for servos.

SBUS has the advantage of allowing up to 16 servos to be be bussed of a single cable.  The first tutorial in the series is an introduction to SBUS and finishes with commanding a few servos to move.  The second tutorial in the series focuses on reading SBUS packets.  The third tutorial in the SBUS series brings together the PWM and  SBUS tutorials to create an SBUS to PWM converter.

The tutorials use Bolder Flight’s SBUS Backpack.  This handy board has pinned out 8 SBUS outputs for easy integration with standard servo connectors, and it come ready to plug in your Teensy 3.2.

If you want to learn more about controlling servos using PWM and SBUS, it’s well worth checking out these tutorials.

Password Keeper

David Hend made a very convenient password keeper.

This compact, low-cost, device features AES-256 bit encryption and stores data on an removable SD card for back up and safekeeping.  Not only does it store passwords, but it has the ability to generate 16 character mixed case passwords as well.

This Instructibles page gives information on how to build your own.

Code for the project can be found on GitHub