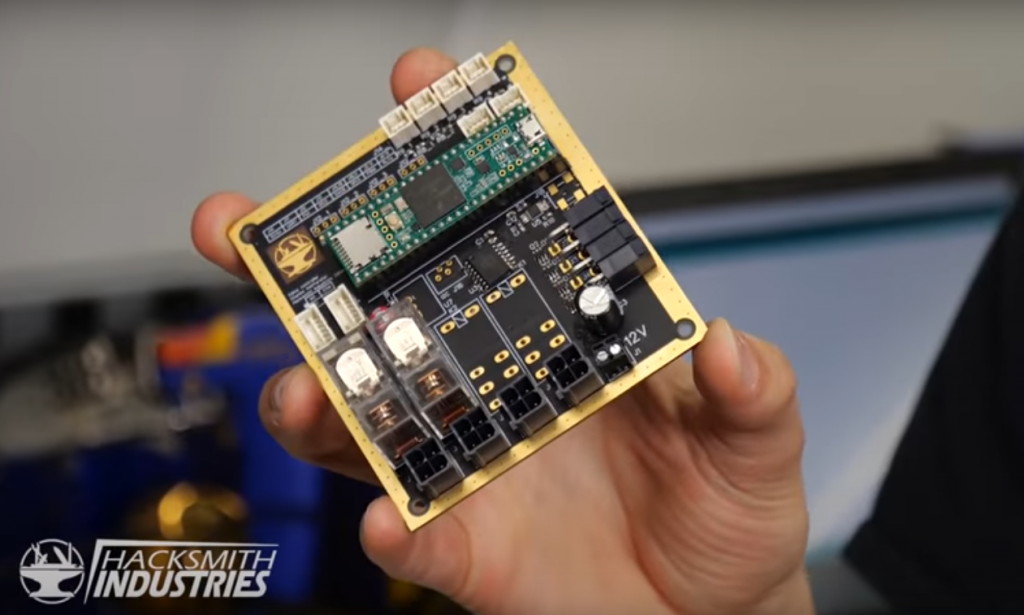
Blog Posts

Lightsaber with Visual FX and Detachable Blade

Scott over at the Firebrand Forge has updated his spectacular lightsaber build using a Teensy 3.2 and a custom open course FX board.

There are many DIY lightsaber projects out there but Scott from The Firebrand Forge takes his version to the next level. The exterior is beautifully made with a detailed chrome handle and a vibrant, brightly lit blade that can be easily detached. Inside the handle is a Teensy 3.2 and a custom, open source FX board that controls the blade’s visual effects.

You can commission your own electronic lightsaber through The Firebrand Forge website, or if you want to have a go at making your own version, Scott has written up the project in detail, including wiring diagrams, a parts list and code.

You can read an article about this lightsaber at an earlier stage on our blog, or take a look at some more of the project details over at Hackaday.

Euclidean Rhythms Sequencer

Morton Kopf has created a beautiful sequencer that makes drum beats based on Euclidean rhythms.

Euclidean rhythms are an algorithmic way of making beats. Computer scientist Godried Toussaint discovered this technique in 2004, but the algorithm it is based on comes from Euclid, a mathematician in Ancient Greece. Euclid’s algorithm gave us a way of finding the divisor between two integers. Applied musically, that means that a musician could choose the number of steps in a sequence and the number of beats within that sequence, and the algorithm will decide where those beats fall. Layering Euclidean rhythms gives musicians an interesting way of creating intricate polyrhythms, leading to this technique becoming one of the more popular ways of making music with algorithms.

Morton Kopf has made a drum machine that uses these Euclidean rhythms in a four track, 16 step sequencer. It runs on a Teensy 3.5, also using four 16 LED Neopixel rings, four RGB rotary encoders and an LCD screen. Aside from the cool maths behind sequencing, one of best things about this project is the quirky, attractive casing Morton Kopf has made from some frosted perspex and an old port wine case.

If you want to have a go at making your own algorithmic rhythm machine, Morton Kopf has released build instructions on their website, plus you can find all the code for this project on their GitHub. You even also order a DIY kit for your modular synth rack if you don’t want to make the PCB or order the components yourself.


Satellite Uplink System for Remotely Operated Underwater Vehicle

Fabio Balzano has made an IOT satellite uplink system to send and receive data from and to his remotely operated underwater vehicle.

Scuba diver, sailor and robotics enthusiast Fabio Balzano needed to find a way to connect his remotely operated underwater vehicle (ROV) with the web to get its telemetry data, but as the planned deployment site was extremely remote, he was unable to rely on radio or even GSM as a way of sending the data. So, he designed and made a system using a Teensy and a Raspberry Pi that is able to send and receive data from and to the ROV via satellite link .

Balzano has written a number of build logs that follow the progress of this project over on Hackaday.io, where you can also find descriptions of some of the tools he used and a schematic for the hardware in his prototype.


LED Pixel Strip Synced to Music with MIDI

This project by Experimental Experience seamlessly syncs music to light using an LED pixel strip, a Teensy 3.2 and MIDI.

Experimental Experience has made an impressive music visualisation project that synchronises a strip of LEDs with music based on MIDI. The software synthesizer used in this project plays audio at the same time as sending USB MIDI data via USB to a Teensy 3.2. The Teensy then uses note on/off and pitch information to control the LEDs, with different colors assigned to each of the 12 notes.

One of the extra special things about this project is how well documented it is. In a detailed, clearly-written article on their website, Experimental Experience provides a detailed tools and materials list, a guide to soldering and assembly, a guide to the software you’ll need to use plus all the code needed to run the project. You can also see more examples of this project working on the Experimental Experience YouTube channel, or see below for their energetic visualisation of Flight of the Bumblebee.


Wearable Gaming Joystick Hat

Carson Kompon has made a super fun DIY game controller project: a wearable that turns his head into a joystick.


Carson Kompon is a gamer who likes to make his own game controllers. For his first experiment with a motion sensor, he decided to attach a Teensy 3.2 and an accelerator onto a hat, turning his head into a joystick. The hat joystick doesn’t prove to be the most effective way of playing but this project gets major points for creativity and fun.

In the video above, he takes us through his project build in detail and demonstrates it working with Tower Unite and Stealthscape, a game he’s been working on that will hit the STEAM store later in 2020. If you want to recreate this project Carson has helpfully published his code and shared his schematic. You can also take a look at Carson’s YouTube channel for more gaming fun.

Eight Channel Digital Color Organ

Craig Lindsay has made a color organ that syncs colorful lights to music using a Teensy 3.1 and the Teensy audio library.

Color organs (also known as light organs) are popular DIY projects for makers who want to play with light and sound. A typical color organ will separate an audio signal into frequency bands, controlling a number of light channels based on the level of each of these frequency bands. Craig Lindsay has taken this idea as inspiration and designed a refined, reliable and feature-packed version of his own.

Lindsay uses a Teensy 3.1, a Teensy Audio Adapter, 120 WS2812B RGB LEDs and a touch screen to make a digital color organ that uses digital signal processing (DSP) instead of the more usual (and less reliable) analog filtering.

An extremely detailed and very helpful write up of the project is available on Lindsay’s website (PDF) , where you can find schematics, component lists, build logs, images of the work in progress, and a list of the libraries required to replicate this color organ. You can also read an article about it in the Nuts and Volts magazine.

Plinky Multi-Touch Surface Synth

Alex Evans has been working on Plinky, a DIY polyphonic instrument with multi touch control and a beautiful reverb heavy sound.


Inspired by the immediacy of Teenage Engineering’s Pocket Operators, Evans set out to make a small synth using a Teensy 3.6, capacitive touch and a LEDs. The synth’s sound was made up of 32 sawtooth waves going into 32 low pass filters in groups of four unison voices with stereo delay and an extra long reverb.

This luscious sounding synth has been a side project for Evans since 2018, who used it to learn about and experiment with a number of different technologies, including Teensy, capacitive touch, PCB design and STM chips. Evans has documented this journey over on his Twitter account, where he shared a collection of his disappointments, successes and learning in a long thread that is really worth reading.

Long Range LED Controller with Audio

BaseTee is a smart LED controller based on the Teensy 3.2 that makes it easier to control large light installations.

Ackalyte are a company based in Melbourne, Australia that make smart LED modules and controllers. One of their products is the BaseTee, a long-range LED controller and carrier board based on the Teensy 3.6. In the tweet below, you can see it in action at Melbourne Zoo, animating a take on the famous frog tessellation artwork by MC Escher.

The BaseTee itself has quad-channel audio, USB-A, ethernet and a mighty 15 output channels. These output channels can be updated simultaneously and are designed for large LED installations. With the right cabling and power supply, LED data can be transmitted over 100m. They’ve also broken out the Teensy’s I/O and analog pins to headers, allowing you to customise your lighting projects with switches and sensors.

For more information on the BaseTee, including a full breakdown of the hardware specs and features, check out Ackalyte’s website. You can also find a repository of example code on their GitHub, or chat to them on Twitter.


Self-Balancing Blue Hedgehog-Inspired Robot

YouTuber James Bruton has made a self-balancing robot with motorized active suspension, inspired by Sonic the Hedgehog and Boston Dynamics. Bruton has published a three part video series about the project on his Youtube channel.

One of most interesting things about this build is the construction of the robot body, which has two mechanical “knees” that bend using ball screws. These knees operate independently of each other, giving the robot active suspension and allowing the robot to lean sideways when turning corners.

Bruton uses brushless motors and ODrive to control the robot, partnered with a Teensy 3.6 and an MPU6050 for processing and stability. You can read an article with more details about this self-balancing robot on Hackster.io or if you’re inspired to have a go at making something similar, the CAD files and code for Bruton’s projects are published on his GitHub. You can support his work on Patreon or by subscribing to his YouTube channel.

Midi Controller Based on Kush Hammer EQ

Paul Hesketh used a Teensy 3.2 to make a physical MIDI controller that controls a software audio plugin called Kush Hammer EQ.

A VST plugin is a virtual synthesis add-on format used by Digital Audio Workstation (DAW) software on PCs. DAWs such as Ableton Live, Logic Pro or Audacity are used to edit audio files for music, podcast and so on. VSTs have lots of complex controls and Hesketh thought it would be much more fun to adjust sounds with a physical controller rather than repetitively pointing and clicking with a mouse.

Hesketh designed his hardware to work with a VST plugin called Kush Hammer EQ, which is based around two channels with three frequency ranges each. As well as the Teensy 3.2, Hesketh used an EEPROM module, a PS2 keyboard driver module, an LCD display and an assortment of buttons, switches, dials and rotary encoders to complete his project. He even got a custom metal enclosure made, which adds to the sleekness of the finished controller.

If you want to have a go at making your own version of this project, Hesketh has released a detailed write up (PDF) of this project including his design process, build instructions, components used and an excellent breakdown of his code.