Graphic LCD Library
The GLCD library by Michael Margolis allows 128x64 graphical displays to be used. Drawing with different fonts, bitmaps, lines, circles and individual pixels are all supported.Download: ks0108.zip (version 2, with Teensy patches)
This copy includes default pin assignments for Teensy board.
Hardware Requirements
A 128x64 graphical LCD based on the KS0108 controller chip is required. The 128x64 LCD sold by PJRC is fully supported.
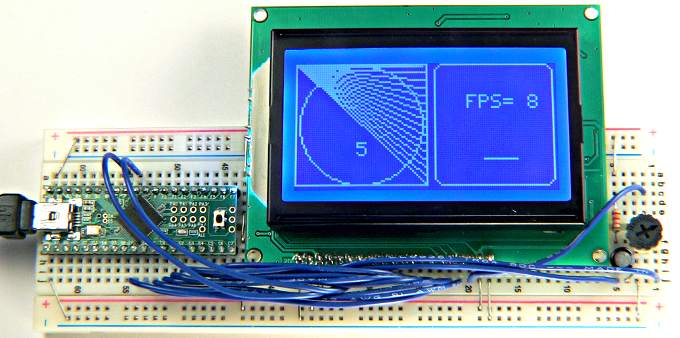 | |
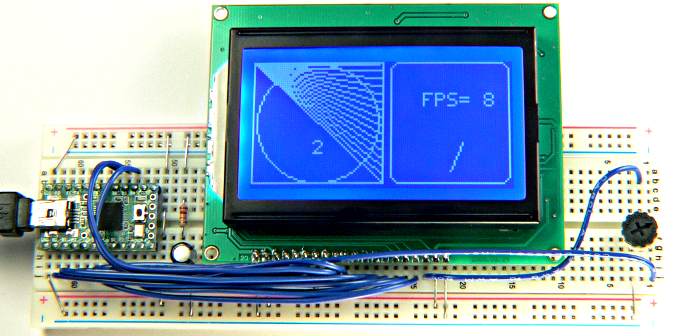
| Teensy++ 2.0 with 128x64 LCD running the example program | (more photos below) |
Teensy to LCD connections are documented below.
Example Program
This example program comes with the library. You can open it from the File -> Examples -> ks0108 -> GLCDexample menu; More information can be found on the official GLCD web page./* * GLCDexample * * Basic test code for the Arduino KS0108 GLCD library. * This code exercises a range of graphic functions supported * by the library and is an example of its use. * It also gives an indication of performance, showing the * number of frames drawn per second. */ #include <ks0108.h> #include "Arial14.h" // proportional font #include "SystemFont5x7.h" // system font #include "ArduinoIcon.h" // bitmap unsigned long startMillis; unsigned int loops = 0; unsigned int iter = 0; void setup(){ delay(500); // allow time for LCD to reset GLCD.Init(NON_INVERTED); // initialise the library, non inverted writes pixels onto a clear screen GLCD.ClearScreen(); GLCD.DrawBitmap(ArduinoIcon, 32,0, BLACK); //draw the bitmap at the given x,y position GLCD.SelectFont(System5x7); // switch to fixed width system font countdown(5); GLCD.ClearScreen(); introScreen(); // show some intro stuff GLCD.ClearScreen(); } void introScreen(){ GLCD.SelectFont(Arial_14); // you can also make your own fonts, see playground for details GLCD.GotoXY(20, 2); GLCD.Puts("GLCD version "); GLCD.PrintNumber(GLCD_VERSION); GLCD.DrawRoundRect(16,0,99,18, 5, BLACK); // rounded rectangle around text area GLCD.SelectFont(System5x7); // switch to fixed width system font showCharacters(); countdown(5); } void showCharacters(){ byte line = 3; // start on the fourth line for(byte c = 32; c <=127; c++){ if( (c-32) % 20 == 0) GLCD.CursorTo(1,line++); // CursorTo is used for fixed width system font GLCD.PutChar(c); } } void drawSpinner(byte pos, byte x, byte y) { // this draws an object that appears to spin switch(pos % 8) { case 0 : GLCD.DrawLine( x, y-8, x, y+8, BLACK); break; case 1 : GLCD.DrawLine( x+3, y-7, x-3, y+7, BLACK); break; case 2 : GLCD.DrawLine( x+6, y-6, x-6, y+6, BLACK); break; case 3 : GLCD.DrawLine( x+7, y-3, x-7, y+3, BLACK); break; case 4 : GLCD.DrawLine( x+8, y, x-8, y, BLACK); break; case 5 : GLCD.DrawLine( x+7, y+3, x-7, y-3, BLACK); break; case 6 : GLCD.DrawLine( x+6, y+6, x-6, y-6, BLACK); break; case 7 : GLCD.DrawLine( x+3, y+7, x-3, y-7, BLACK); break; } } void countdown(int count){ while(count--){ // do countdown GLCD.CursorTo(0,1); // first column, second row (offset is from 0) GLCD.PutChar(count + '0'); delay(1000); } } void loop(){ // run over and over again iter = 0; startMillis = millis(); while( millis() - startMillis < 1000){ // loop for one second GLCD.DrawRect(0, 0, 64, 61, BLACK); // rectangle in left side of screen GLCD.DrawRoundRect(68, 0, 58, 61, 5, BLACK); // rounded rectangle around text area for(int i=0; i < 62; i += 4) GLCD.DrawLine(1,1,63,i, BLACK); // draw lines from upper left down right side of rectangle GLCD.DrawCircle(32,31,30,BLACK); // draw circle centered in the left side of screen GLCD.FillRect(92,40,16,16, WHITE); // clear previous spinner position drawSpinner(loops++,100,48); // draw new spinner position //GLCD.FillRect(24,txtLINE3,14,14, WHITE); // clear text area that will be drawn below GLCD.CursorTo(5,5); // locate curser for printing text GLCD.PrintNumber(++iter); // print current iteration at the current cursor position } // display number of iterations in one second GLCD.ClearScreen(); // clear the screen GLCD.CursorTo(14,2); // positon cursor GLCD.Puts("FPS= "); // print a text string GLCD.PrintNumber(iter); // print a number }
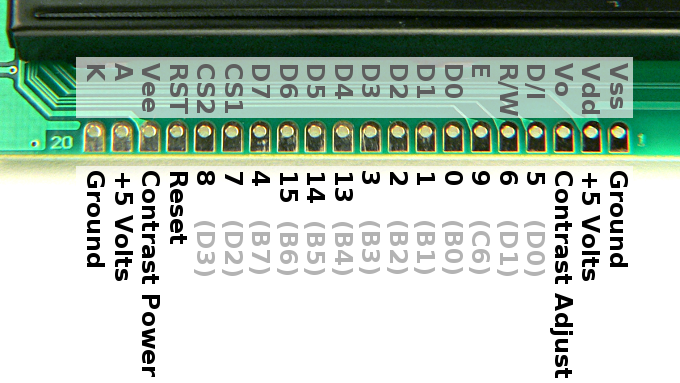
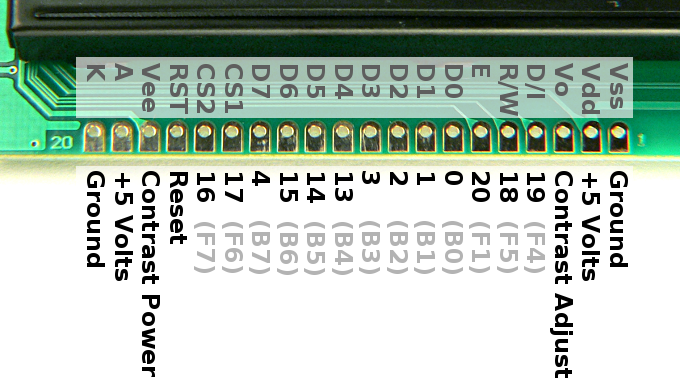
Connecting the LCD to Teensy or Teensy++
Standard Connections for Teensy++ 1.0 or 2.0: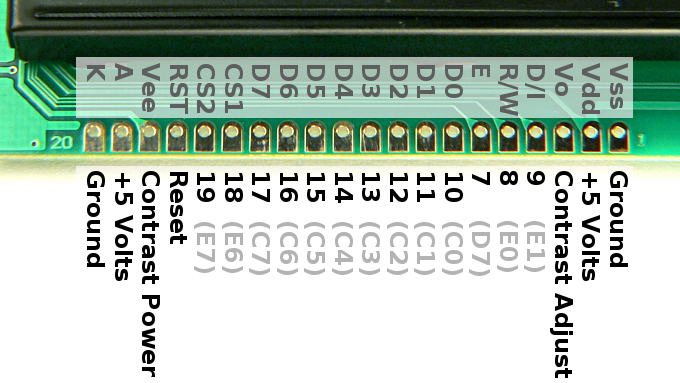
Standard Connections for Teensy 2.0:
Alternate connections for Teensy 2.0: (you must edit the code to enable this connection)
The display requires a contrast adjustment potentiometer. A value of 5K or 10K works well. The center terminal must connect to the "Contrast Adjust" pin (Vo). The two side terminals must connect to the "Contrast Power" pin (Vee) and Ground. It does not matter which sides of the potentiometer you connect these 2 signals, as the reverse connection will simply make the clockwise rotation adjust in the opposite direction.
The reset pin should be connected to +5 volts. It is not necessary to drive the reset pin low before using the LCD.
Alternately, the reset pin may be connected to any unused pin on your Teensy, if you want a hardware connection that resets the LCD to its default state. Before initializing the LCD, output a low to reset the LCD, then high to allow it to operate. For example:
void setup() {
  pinMode(3, OUTPUT);
  digitalWrite(3, LOW);  // reset the LCD
  delay(10);
  digitalWrite(3, HIGH); // allow it to run
  GLCD.Init(NON_INVERTED);
  GLCD.ClearScreen();
}
More Photos
 |
| Teensy 2.0 with 128x64 LCD running the example program |
If you have used a Teensy with a this library, please send a photo to add to this page. Be sure to include the model or info about the LCD, and if you'd like you name or email to appear.