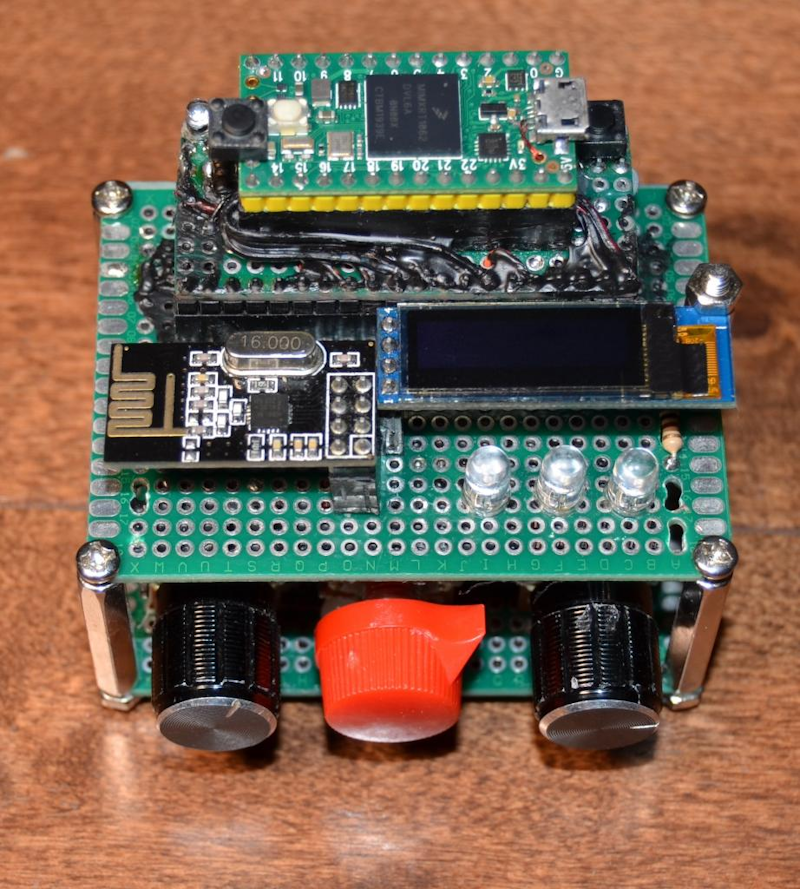
Blog Posts

8086 PC Emulator with CGA Graphics

What do Two Guys from Andromeda and Bill Gates have in common? They are both responsible for code that will run on a Teensy!

Now, it’s entirely possible that none of them have heard of Teensy (as unfortunate as that may be!) let alone knew that their code ran on it, but that’s where Mike Chambers’ Teensy 3.6 based 8086 PC emulator with CGA graphics, PS2 keyboard comes in!

The project started out as a software-based emulator, but Mike was curious to see how it might perform on a microcontroller; with even the most humble Arduino out-clocking and even out MIPS-ing early PCs, it seemed like an interesting proposition. Unfortunately, even that most stalwart member of AVR’s 8-bit stable, the ATmega2560, proved no match for the job. Fortunately, Mike discovered the muscle he needed in the form of the Arm Cortex-M4 in our very own Teensy 3.6!

As thrilling as it is just to see a DOS prompt on our 320×240 display, being able to recreate Prince of Persia’s legendarily smooth motion gives you a real feel for the potential of this project – and that was before any optimization or overclocking! In the videos below, Mike also shows the Sierra Online classic Space Quest, and even Microsoft Windows 3.0 running on his Teensy tiny PC:

Mike shares his source code and which pins to connect the SPI RAM, LCD, and keyboard to in a forum post, as well as specs for the required hard drive image, which runs from microSD. Observant readers may notice that most venerable DOS-based palmtop, the HP 200LX, in the background of his project pic – perhaps foreshadowing a full-blown Teensy handheld?!

Arduino IDE 2.0.0 Teensy Support

Today Arduino released IDE version 2.0.0, with autocomplete, faster compile, and many other improvements.

Teensy is supported using Arduino’s Boards Manager.  A separate installer is no longer needed.

To install Teensy on Arduino IDE 2.0.0, click File > Preferences.  In “Additional boards manager URLs”, copy this link:

https://www.pjrc.com/teensy/package_teensy_index.json

You can copy this link directly, or click the icon to the right to expand the “Additional boards manager URLs” to an easier to edit window.

Then click the Boards Manager icon on the left side.

In the boards manager column, type “teensy” in the “Filter your search…” box.  When Teensy appears, hover your mouse to expand and then click the INSTALL button.

To start using Teensy, either select your board from the Tools > Boards menu, similar to Arduino 1.8.x, or if a Teensy board is connected to your computer, select it in the drop-down menu of detected hardware.

Teensyduino 1.57 Released

Teensyduino 1.57 has been released.

Here is detailed look at the new & improved features in version 1.57.

USBHost_t36 USB Disk Support

USBHost_t36 now supports use of USB disk drives connected to the USB host port on Teensy 3.6, 4.0, 4.1, thanks to a major contribution from Warren Watson, also with work from KurtE and mjs513.

To use USB disks, you create instances of the USBDrive and USBFilesystem classes.  USBDrive provides the driver which actually communicates with your disk over USB.  It also parses the drive’s partition table and allocates each supported filesystem with a USBFilesystem instance.

Each USBFilesystem is used the same way as the SD library.  You can call open() to access files, remove() to delete files, and so on.  The open() function returns a File instance, so it can be used with all libraries using File originally developed for the Arduino SD library.

With Teensyduino 1.57, USBFilesystem uses the SdFat library to access the actual filesystem, so only FAT filesystems are currently supported.  Filesystem size is limited to 2TB due to SdFat, though KurtE has added support for GUID partition tables needed to recognize larger drives, so FAT filesystem within the first 2TB of a larger drive can be used.  Support for larger disks may come in future versions.

Warren has also worked on a library to support Linux EXT filesystems.  Hopefully we will find a way to integrate this in future Teensyduino releases.

Audio ADC Input, PWM Output, Dynamic Connections

Teensy 4.0, 4.1, MicroMod now support audio input using analog input pin A2 (pin 16).  Earlier versions labeled this feature “experimental” due to lack of proper DC filtering, improper signal level and generally poor performance.

With all Teensy models, and as a general rule for microcontrollers, audio input using a built in ADC suffers from noise coupling from the digital circuitry on the same chip.  A strong (low impedance) signal is needed to drive the analog pin.  Signal quality is never as good as using a dedicated external audio ADC chip, but it can be acceptable for applications like sound reactive lighting.

PWM output (AudioOutputPWM) is also now supported on Teensy 4, thanks to a contribution from Mark Tillotson, which fixes early code written by Frank B.  Normally MSQ output, which is PWM with special noise shaping, gives better performance.  But MQS is limited to only pins 10 and 12, which conflicts with the main SPI port.  PWM can use any of the PWM pins which are controlled by FlexPWM timers.

AudioConnection between audio library components can now be created dynamically, thanks to a contribution by Jonathan Oakley.  While creating a static set of connections using the design tool is still the most common usage, you can now create connections with C++ new and destroy them with C++ delete, altering the audio processing system while it is running.

MTP, Improving But Still Experimental

Media Transfer Protocol is the standard method Android phones use to share files over USB with your PC.  Work is progressing to fully support MTP on Teensy.  Fredrik Hubinette, KurtE, mjs513, WMXZ, Defragster, MichaelMC, and Yoong Hor Meng have contributed to bringing MTP to Teensy!

To try MTP with Teensyduino 1.57, select either “MTP Disk (Experimental)” or “Serial + MTP Disk (Experimental)”.

To use MTP you will also need this MTP_Teensy library.

https://github.com/KurtE/MTP_Teensy

Many of the MTP_Teensy library examples are quite complex, as they’re intended for testing code still in development.  To get started with simple examples, click File > Examples > MTP_Teensy > Simplified Examples.  The 3rd example shows how to share a SD card using MTP.

The primary function used is MTP.addFilesystem(), which causes MTP to access the filesystem and make it available to your PC.  You should see “Teensy” appear on the Windows Explorer under “This PC”, offering you access to any drives you used with MTP.addFilesystem().

You can call MTP.addFilesystem() multiple times to share SD cards, LittleFS filesystems on flash memory chips, and USBFilesystem instances for USB connected storage.  Each filesystem appears in Windows (or Linux, or Macintosh using Android File Transfer) with the name you gave to MTP.addFilesystem().

Of course, clicking on each filesystem in Windows lets you access all its folders and files.

MTP accesses your filesystems using their native filesystem libraries, rather than directly accessing the filesystem as raw data blocks as USB Mass Storage protocol would.  While USB MSC is easier to implement, and is commonly used with other microcontrollers, MSC can not safely allow both the host PC and device to simultaneously access the same filesystem.  MTP can, which is the reason modern Android Phones use MTP rather than MSC, and why Apple iPhone uses a proprietary protocol similar to MTP.

Much work remains to achieve usable simultaneous access to files by both MTP and Teensy.  Today Teensy’s MTP implementation supports only a small subset of notifications messages to tell your PC when code running on Teensy has made changes.  Properly supporting removable media like SD cards and USB drives is also currently limited, needing better support for media change by the underlying SdFat and USBHost_t36 libraries and Teensy’s FS filesystem class.  So we’re still calling MTP “experimental”, even though is it working quite well for basic usage.

Arduino IDE 2.0-rc9 Support

Teensyduino 1.57 includes support for Arduino’s next IDE, which is currently at version 2.0-rc9.  To use it, download from Arduino’s software page.  Scroll down to “Future Version of the Arduino IDE”.

Starting with Arduino 2.0, Teensyduino no longer requires a special installer.  To add Teensy support, click File > Preferences and add this URL in “Additional board manager URLs” (this URL will change as IDE 2.0 support matures).

https://www.pjrc.com/teensy/td_156/package_teensy_index.json

Then in the left side bar, click the 2nd icon for the boards manager and search for “Teensy”.  Click the “Install” button to add Teensy support.

Arduino IDE 2 supports Pluggable Discovery and Pluggable Monitor, which allows Teensy to work properly with all of its special USB types.  Earlier 1.8.x versions supported an early version of Pluggable Discovery and the installer adds a custom Pluggable Monitor.  A special installer work is not needed with IDE 2.0 now that Arduino officially supports these features.

Teensyduino 1.57 fixes a problem where having the IDE 2.0 packages installed could confuse Arduino 1.8.x.  Now you can have both installed, where the IDE 2.0 package will not interfere with your installation to Arduino 1.8.x.  But if you use Teensyduino 1.56 or earlier, the only solution to also using IDE 2.0 on the same machine was to put Arduino 1.8.x into Portable Mode.

Arduino IDE 2.0 is still in development.  Since 2.0-rc7 it has become quite usable with Teensy, and rc9 continues to improve, but some issues remain.  The Servo library can not be used due to this library search location issue.  It still has no way add special tools, so there is no Teensy 4 Security menu needed for Lockable Teensy.  The Serial Monitor can not be displayed as its own window, and sending text requires an awkward ctrl+enter keystroke.  On some computers, IDE 2.0 can get stuck slowly indexing files or performing other background work very slowly.

Despite some rough edges, Arduino IDE 2.0-rc9 adds many nice features.  It does work well with Teensyduino 1.57, if you want to give it a try.

CrashReport Breadcrumbs

CrashReport is a feature added by Teensyduino 1.54 to help diagnose software crashes on Teensy 4.x.  The default fault handler logging information about the fault condition to a small reserved area in RAM, then reboots after 8 seconds.

When Teensy 4 starts up, setup() or other functions can test whether CrashReport info is available and print it to the serial monitor, or to a file on storage media (including LittleFS filesystem in a portion of the program flash memory), or send to a network connection, or any other place which implements the Arduino Print class.

Learning the memory location, or “where” your code crashed, is usually not enough to understand “why” it happened.  Typically you need to know what was happening just before the crash.

Breadcrumbs allow you to log up to 6 different 32 bit numbers.  A typical usage might look like this.

If this program crashes, the number CrashReport prints for Breadcrumb #1 can help establish which part of your program was running.  More complex usage might use other Breadcrumb numbers throughout interrupt functions or certain libraries.
A Breadcrumb example program was contributed by Defragster which demonstrates Breadcrumb usage in a complete example you can run to see the results.

Wire Library Slave Mode For Teensy 4

The Wire library finally supports I2C slave mode on Teensy 4.  Previously slave mode could only be used by Richard Gemmell’s library.  Now examples and tutorials which use the Arduino Wire library in slave mode (listening for other I2C to communicate with its address) will just work.

In testing I2C slave mode while using audio and while communicating with with Arduino Portenta, it was discovered the SCL pin on Teensy 4 can be sensitive to high frequency signals, including the MCLK signal used for digital audio or high frequency PWM by analogWriteFrequency(), and very likely high frequency signals from other chips.  Adding a 22pF capacitor between SCL and GND greatly reduces SCL sensitivity to high frequency interference.

MacOS Crash Workaround

Since Teensyduino 1.42, Teensy running as a USB serial device appears twice in Arduino’s Tools > Ports menu. When “Teensy ports” is selected, a utility program is run which handles communication with Teensy, and the serial monitor is replaced by highly optimized code.  When “Serial ports” is selected, the JSSC java serial library communicates with Teensy and Arduino’s original serial monitor is used, which can be overwhelmed by the high speed of Teensy 4 sustained printing.

The utility program uses MacOS native functions to efficiently communicate with Teensy.  Unfortunately, recent versions of MacOS Monterey (and perhaps other recent versions) have a terrible bug which can completely crash MacOS in certain rare conditions.

The serial monitor utility program for MacOS has been rewritten from the ground up for Teensyduino 1.57.  The new version completely avoids the MacOS API functions associated with the crash.

This bug has been reported to Apple.

Bug Fixes and Updates

SdFat was updated to fix a bug with writing large files to FAT64 (exfat) formatted cards.

Audio output for PT8211_2 on pins 2,3,4 (2nd digital audio port) has been fixed.  This was a particularly insidious bug, where PT8211_2 would sometimes works, sometimes fail, depending on which other seemingly unrelated libraries were used.

QuadEncoder library updated by mjs513.

Audio S/PDIF asynchronous mode improved by Jonathan Oakley.

Ethernet library now supports use of other SPI ports ports, thanks to Kurt E.

SD library SdFat_Usage example was updated with examples to use other SPI ports.

RawHID recv() with zero timeout fixed was fixed by Kurt E.

The startup code was made more similar between Teensy 3 and 4.  This will allow example code in upcoming documentation on the 3 startup hooks to work the same way across Teensy LC, 3.2, 3.5, 3.6, 4.0, 4.1, MicroMod.

EEPROM get() and put() work with String thanks to Luni64.

The Tlc5940 library, for controlling LEDs, was ported to Teensy 4.

OctoWS2811 getPixel() supports RGBW, thanks to Tobias Johansson.

Digital signatures were added to utility programs on Windows, to hopefully reduce problems with false positive detection by anti-virus programs.

LED Ping Pong Ball Display

Looking to build a large LED display project  David Vogt came up with this magnificent LED Ping Pong Ball display.

Because this project was for high school students it needed to be easy to assemble without advanced electronics skills.  It also needed to be budget friendly.

Early in the design it was decided to use ping pong balls to diffuse the LEDs.  This set the spacing of the LEDs to the 38 mm diameter of the ball.  This created a new challenge as the convenient LED strips don’t match up to this desired spacing.  Cutting up the LED strips into individual parts and rewiring them was not desired.  David came up with a 3D printed matrix frame to mount the ping pong balls and would easily hold individual PCB mounted LEDs. The custom matrix is modular and allows for easy construction.

The individual ping pong ball holders mount into a larger matrix to hold them together and make it easier to wire up the LEDs.

The task of cutting and stripping wire for the 1800 solder joints was not one that David relished.  He got creative and rigged up a jig using card stock to hold the wire and used a laser cuter to strategically strip insulation off the wire. The wire was then ready to be placed in the holder and be soldered up.

The display is controlled with a combination of a Raspberry Pi to generate the images and a Teensy 3.2 to send the data to the display.

The end result is a massive LED display that is fun to watch.

Code for the project is available on GitHub

The STL 3D print files are available on the project page

This project was also covered by Hackaday and Hackster.io


IBM Model M Keyboard Restoration

Thea “Stargirl” Flowers restored this non-working IBM Model M keyboard by creating all new electronics.

The electronics are replaced by this custom circuit board.

On Twitter, she explains “Unless the controller board is fried (like this one was) I recommend using an external converter over doing this, as they are nice vintage electronics and should be preserved if possible.” and “If it’s mint and functional I’d go for a ps/2 to USB adapter and leave the guts intact. This one came to me non-functional so I had to replace the membrane and control board.

But replacing all the electronics did allow for small upgrades, such as replacing 3 LEDs.

A second PCB with 3 addressable LEDs allows them to be any color.

While a detailed blog article was never written, she did share all the source code and PCB files on GitHub, of which she explains “With two months of free time you too can have a USB model M! (Or you can just buy a ps/2 to USB converter)“.

Propane Powered Lightsaber

HACKSMITH Industries have produced the world’s first retractable plasma-based lightsaber.

The lightsaber is controlled by a Teensy 4.0 and powered by LPG (compressed liquid propane gas) mixed with oxygen. The resulting plasma burns at 4000 degrees Fahrenheit and is able to cut through titanium. This powerful combination was made using a bespoke circuit design that you can find and inspect on the DigiKey site.

Hacksmith Industries has an active YouTube channel where you can find more of their ambitious builds.


High Resolution Budget Polarimeter

A team of research scientists including John de Mello, A.J. Harvie, and T.W. Phillips have developed a low-cost, high-accuracy polarimeter that uses a Teensy 3.6.

In the study released in Scientific Reports, the team reveals the inspiration for the project as well as their DIY approach to creating the plans for a low cost but high resolution open-hardware instrument suitable for scientific research.

Polarimeters are typically very expensive but extremely useful devices. They are used to measure the angle of rotation caused by passing polarized light through an optically active substance and can actually be used to distinguish chemicals as many chemicals have a unique rotational-angular signature. While the first polarimeters developed in the 60s needed to be controlled manually, modern polarimeters are motorized with integrated photo detectors and can be used to take automatic measurements. A single device, however, can cost upwards of $14,000.

In a tweet, nanomaterials specialist John de Mello stated the team wanted to create a device which could produce the same “high-end specs at a bargain-basement price.” For inspiration, the team loosely based their model on a design by the All-Russia Scientific Research Institute of Optophysical Measurements.


Nintendo Power Glove Modification

Glytch, an electronics hobbyist, has produced a Nintendo Power Glove modification that grants the device an impressive amount of control.

The Nintendo Power Glove is perhaps one of the most iconic and nostalgic pieces of wearable gaming technology. Originally released in 1989, the glove wasn’t as successful in its functionality as it was in its marketing. Featured in the film The Wizard, the glove was marketed as a virtual reality controller capable of granting players “free-flowing instant response” but many users found the controls difficult to use as the glove only provided tracking on one axis (roll) using ultrasonic sensors and used conductive ink to track the fingers leading to low resolution hand tracking.

Glytch’s mod gives the glove the power to control robots weighing up to 200 lbs. More specifically, a t-shirt cannon! In a post made to Twitter, Glytch shows off the project in progress controlling a small rover.

The project arrives just in time for the Power Glove’s 30th anniversary. In a video Glytch uploaded to his Youtube Channel he talks about how amusing it is to hack a piece of technology that’s seven years older than he is. The project uses a Teensy LC, two NRF modules for transmitting data between the glove and the robot, an IMU in place of the original ultrasonic sensors for hand tracking, flex sensors for finger tracking, and custom PCBs developed by Nolan Moore who has also shared his own mod which the project is based on at Hackster.io.

Glytch has previously worked on lots of awesome projects, including hacking your laptop’s webcam and modifying your 3D printer to run on USB-C.

The Dwelling – Electronic Art at Burning Man

The Dwelling is an electronic art installation designed for Burning Man 2019. The Dwelling is a stranded alien spaceship, pulsing and glowing with light at night.

For hardware hackers with an artistic side, the Burning Man playa is known as a great place to find inspiration and experiment with electronic art. The Dwelling was built by a group of hackers and artists including Philip Levis, Jasmine Brackett and Yariv Keinan.

If you want to see more pictures of the finished installation or of the artwork at various stages during its construction, the creators of the Dwelling project have published extensive build logs over on their blog. They have also wrote a super informative post about the external electronics with a detailed breakdown of the lighting set up, power requirements and their plans to drive it all with the Teensy 3.6.